02.form 태그연습
폼 연습 인적사항 이 름 아 이 디 비밀 번호 주민 번호 - 성 별 여자 남자 기타 사용 언어 한글 영어 독어 일어 국 적 한국 미국 중국 태국 취 미 요가 영화 러닝 테니스 이 태그들을 불
practice365.xyz
form 태그의 기본 구성은 위쪽 게시글을 참고
다양한 효과들을 한 번에 적용한 탓에 미적 감각이라는 게 0에 수렴하지만.. form 태그의 옵션들을 한 눈에 볼 수 있습니다.
<!DOCTYPE html>
<html lang="en">
<head>
<meta charset="UTF-8">
<title>Document</title>
<style>
fieldset{ width:400px; height:430px; background:skyblue; }
legend{ text-align:center; background:white; }
#d1{ float:right; padding: 10px 10px 0px 0px; }
</style>
</head>
<body>
<form action="jsp.jsp" method="post">
<!-- 아직 안 배웠지만 -->
<fieldset>
<legend>인적사항</legend>
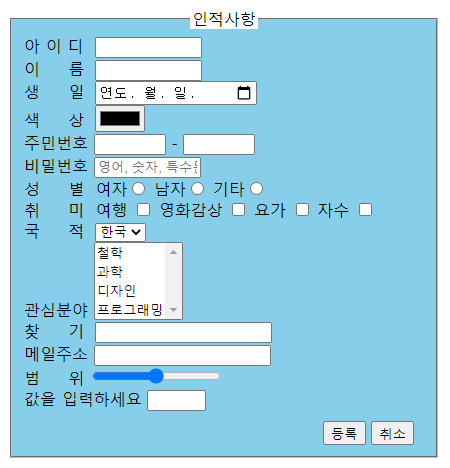
아 이 디 <input type="text" size="10" maxlength="10" autofocus required ><br> <!-- 다음으로 못 내려가도록 -->
이 름 <input type="text" size="10"><br>
생 일 <input type="date"><br>
색 상 <input type="color"><br>
주민번호 <input type="text" size="5" maxlength="6"> -
<input type="password" size="5" maxlength="7"><br>
비밀번호 <input type="password" size="10" maxlength="12" placeholder="영어, 숫자, 특수문자"><br>
성 별 <label>여자<input type="radio" name="s1"></label>
<label>남자<input type="radio" name="s1"></label>
<label>기타<input type="radio" name="s1"></label><br>
취 미 <label>여행 <input type="checkbox" name="c1"></label>
<label>영화감상 <input type="checkbox" name="c1"></label>
<label>요가 <input type="checkbox" name="c1"></label>
<label>자수 <input type="checkbox" name="c1"></label><br>
국 적 <select>
<option>한국</option>
<option>일본</option>
<option>중국</option>
</select><br>
관심분야 <select multiple="multiple">
<option>철학</option>
<option>과학</option>
<option>디자인</option>
<option>프로그래밍</option>
</select><br>
찾 기 <input type="search"><br>
메일주소 <input type="url"><br>
범 위 <input type="range" min="3" max="9"><br>
값을 입력하세요 <input type="number" min="3" max="8"><br>
<div id="d1">
	<Button type="submit">등록</button>
	<input type="reset" value="취소">
</div>
</fieldset>
</form>
</body>
</html>
서비스 차원으로 넣는 옵션들이다.
아 이 디 <input type="text" size="10" maxlength="10" autofocus required ><br>autofocus 오토포커스 자동으로 커서 넣기. 첫 화면에 들어가자마자 자동으로 커서가 넣어진다.
required 리콰이어드 필수 라는 뜻으로 입력하지 않으면 다음으로 넘어가지 않는다는 뜻 경고수준만 하는 정도로 절대로 안 넘어 가는 것은 아님.
생 일 <input type="date"><br>
색 상 <input type="color"><br>date 날짜를 입력할 수 있음
color 색상을 입력할 수 있음
비밀번호 <input type="password" size="10" maxlength="12" placeholder="영어, 숫자, 특수문자"><br>placehoolder 인풋 창에 연한 글씨가 써진다. 사용자가 누르면 자동으로 없어짐.
찾 기 <input type="search"><br>
메일주소 <input type="url"><br>search 찾기 말 그대로 찾아서 입력하는 용도인데 html, css만 가지고선 연동을 할 수 없음
url 메일주소 및 개인의 도메인주소 등을 입력하는 용도
범 위 <input type="range" min="3" max="9"><br>
값을 입력하세요 <input type="number" min="3" max="8"><br>range 레인지 범위 라는 뜻으로 말그대로 범위를 입력 할 수 있다. min과 max로 최소값 최대값 설정 가능하고 바(bar) 형태로 되어 있음
number 비슷한 옵션이지만 숫자 형태로 입력할 수 있다.
<div id="d1">
<Button type="submit">등록</button>
<input type="reset" value="취소">
</div><input type="submit" value="전송" 이 방법도 있지만
<button type="submit">전송</button> 이 방법도 있음
reset 취소 버튼 글자는 value 안에 입력
내가 div 안에 넣은 이유는 범위 설정을 한 뒤 오른쪽 정렬을 하고 싶어서...
'개발일지 > Front' 카테고리의 다른 글
| list 목록 태그 알아보기 (ol ul dl - li dt dd) (0) | 2021.09.03 |
|---|---|
| 인라인, 블록 박스, 인라인 블록 유형 설명 (0) | 2021.09.03 |
| html 파일 frame 영역에 불러오기(src), 주석 (0) | 2021.09.03 |
| 클래스 선언과 화면 나누기 (0) | 2021.09.02 |
| css 파일 불러오기(link,import) (0) | 2021.09.02 |


